Amazon CloudFront - Origin Group
Objective
This exercise will show you the steps for using the Amazon CloudFront Origin Group mechanism, using Amazon S3 buckets as the origins. During this lab it will be created two S3 buckets and when the Amazon Cloudfront distribution receive a error code from Amazon S3 on Primary Region, it will trigger the same request on Secondary Region automatically.
If you want more information click here.
By the end of this exercise, you will be able to:
- Create resilient Amazon CloudFront distributions with two origins, the primary to deliver content and the secondary for failover.
Estimated Duration: 30 minutes
Approximate Cost: 1 USD
Solution Overview
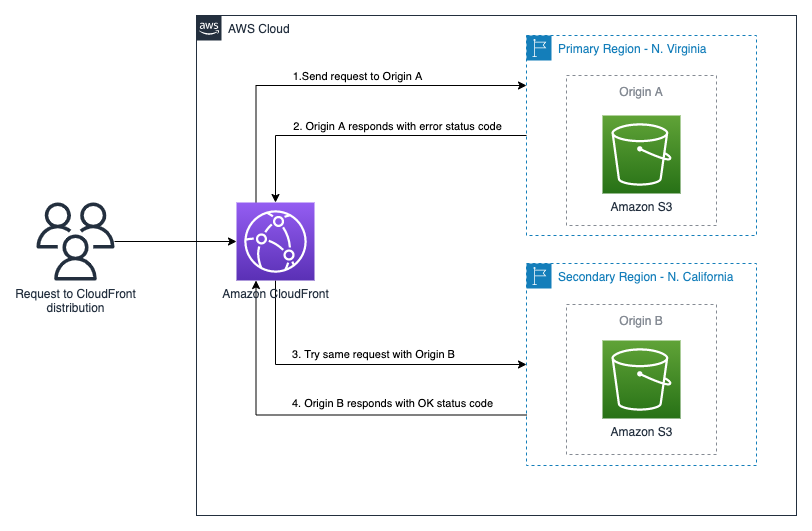
Execution
1. Go to AWS CloudShell
-
Go to AWS CloudShell, in the top bar of the AWS Console, click the button on the right side of the search bar.
-
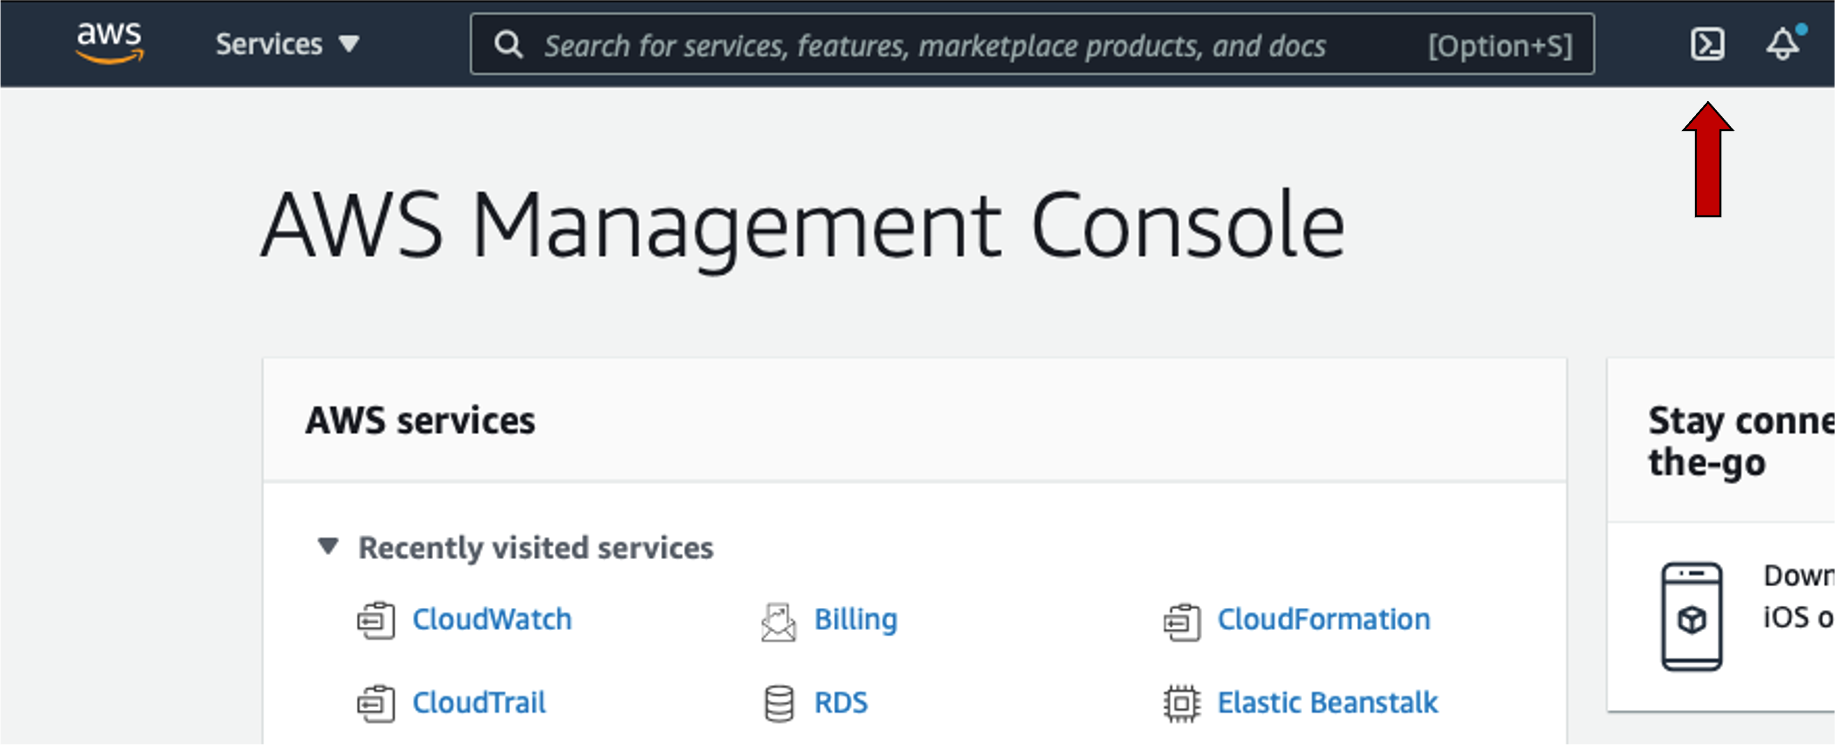
Using AWS CloudShell we don’t have to set up access though AWS CLI locally or AWS Cloud9.
2. Create the configuration variables
- Create the configuration variables to make it easier to use scripts
# AWS Account ID
ACCOUNT_ID=$(aws sts get-caller-identity | jq -r .Account)

# Bucket Name - Primary Region
VIRGINIA_LAB_BUCKET=${ACCOUNT_ID}-mini-lab-cf-virginia

# Bucket Name - Secondary Region
CALIFORNIA_LAB_BUCKET=${ACCOUNT_ID}-mini-lab-cf-california
Stay tuned so you don’t miss the AWS CloudShell session for inactivity, if the session is lost, the variables will be removed.
3. Create two buckets on Amazon S3 to be the sources
-
Create two S3 buckets in the primary and secondary region, in this case US East (N. Virginia) and US West (N. California).
aws s3 mb s3://${VIRGINIA_LAB_BUCKET} --region us-east-1 aws s3 mb s3://${CALIFORNIA_LAB_BUCKET} --region us-west-1 -
Create the files to send to buckets
echo "File in N. Virginia S3" > virginia.index.html
echo "File in N. California S3" > california.index.html
The content of the files are different to make it easier to know which AWS Region they come from.
-
Copy the files to their buckets
aws s3 cp virginia.index.html s3://${VIRGINIA_LAB_BUCKET}/index.html
aws s3 cp california.index.html s3://${CALIFORNIA_LAB_BUCKET}/index.html
4. Create a Origin Access Identity on Amazon CloudFront
- Create a Origin Access Identity to have an identity and subsequently give access to the source buckets.
OAI_ID=$(aws cloudfront create-cloud-front-origin-access-identity \
         --cloud-front-origin-access-identity-config \
         CallerReference="cloudfront-mini-lab-example",Comment="CloudFront Origin Group Example" \
         | jq -r '.CloudFrontOriginAccessIdentity.Id')
It is made use of Command Substitution next to the command jq to store the result of the command in a variable.
5. Create Access Policies on Buckets to Allow Amazon CloudFront Access
-
Create bucket access policies in the primary region, in this case US East (N. Virginia).
cat <<EOT > virginia-s3-policy.json { "Version": "2008-10-17", "Id": "PolicyForCloudFrontPrivateContent", "Statement": [ { "Sid": "1", "Effect": "Allow", "Principal": { "AWS": "arn:aws:iam::cloudfront:user/CloudFront Origin Access Identity ${OAI_ID}" }, "Action": "s3:GetObject", "Resource": "arn:aws:s3:::${VIRGINIA_LAB_BUCKET}/*" } ] } EOT -
Create bucket access policies in the secondary region, in this case US West (N. California).
cat <<EOT > california-s3-policy.json { "Version": "2008-10-17", "Id": "PolicyForCloudFrontPrivateContent", "Statement": [ { "Sid": "1", "Effect": "Allow", "Principal": { "AWS": "arn:aws:iam::cloudfront:user/CloudFront Origin Access Identity ${OAI_ID}" }, "Action": "s3:GetObject", "Resource": "arn:aws:s3:::${CALIFORNIA_LAB_BUCKET}/*" } ] } EOT -
Apply policies to both buckets.
# Apply policy to grant access to cloudfront distribution
aws s3api put-bucket-policy \
  --bucket ${VIRGINIA_LAB_BUCKET} --policy file://virginia-s3-policy.json

aws s3api put-bucket-policy \
  --bucket ${CALIFORNIA_LAB_BUCKET} --policy file://california-s3-policy.json
6. Create the Amazon CloudFront Distribution
-
Create the distribution configuration file, this configuration will already create both sources (one for each bucket), and the source group with both sources, also disables the cache for easy testing.
cat <<EOT > cf-distribution.json { "CallerReference":"mini-lab-example", "Aliases":{ "Quantity":0 }, "DefaultRootObject":"index.html", "Origins":{ "Quantity":2, "Items":[ { "Id":"mini-lab-origin-virginia", "DomainName":"${VIRGINIA_LAB_BUCKET}.s3.amazonaws.com", "S3OriginConfig":{ "OriginAccessIdentity":"origin-access-identity/cloudfront/${OAI_ID}" }, "ConnectionAttempts":1, "ConnectionTimeout":2 }, { "Id":"mini-lab-origin-california", "DomainName":"${CALIFORNIA_LAB_BUCKET}.s3.us-west-1.amazonaws.com", "S3OriginConfig":{ "OriginAccessIdentity":"origin-access-identity/cloudfront/${OAI_ID}" }, "ConnectionAttempts":1, "ConnectionTimeout":2 } ] }, "OriginGroups":{ "Quantity":1, "Items":[ { "Id":"mini-lab-origin-group-example", "FailoverCriteria":{ "StatusCodes":{ "Quantity":6, "Items":[ 404, 403, 500, 502, 503, 504 ] } }, "Members":{ "Quantity":2, "Items":[ { "OriginId":"mini-lab-origin-virginia" }, { "OriginId":"mini-lab-origin-california" } ] } } ] }, "DefaultCacheBehavior":{ "TargetOriginId":"mini-lab-origin-group-example", "ForwardedValues":{ "QueryString":false, "Cookies":{ "Forward":"none" }, "Headers":{ "Quantity":0 }, "QueryStringCacheKeys":{ "Quantity":0 } }, "TrustedSigners":{ "Enabled":false, "Quantity":0 }, "TrustedKeyGroups":{ "Enabled":false, "Quantity":0 }, "ViewerProtocolPolicy":"allow-all", "MinTTL":0, "MaxTTL":0, "DefaultTTL":0, "AllowedMethods":{ "Quantity":2, "Items":[ "HEAD", "GET" ], "CachedMethods":{ "Quantity":2, "Items":[ "HEAD", "GET" ] } } }, "CacheBehaviors":{ "Quantity":0 }, "Comment":"", "Enabled":true } EOT -
Build the Distribution on Amazon CloudFront.
CLOUDFRONT_ID=$(aws cloudfront create-distribution \
                --distribution-config file://cf-distribution.json | jq -r '.Distribution.Id')
After requesting the creation of the distribution, it is necessary to wait about 10 minutes for the distribution to be available.
-
While you wait, you can check the distribution status with the command below.
STATUS=InProgress
while [ "$STATUS" == "InProgress" ];
do
  STATUS=$(aws cloudfront get-distribution \
    --id ${CLOUDFRONT_ID} | jq -r '.Distribution.Status')
  echo "Status: "$STATUS
  sleep 3
done
7. Try CloudFront Distribution
-
Get the URL of the distribution created in the previous step.
CLOUDFRONT_URL=$(aws cloudfront get-distribution --id ${CLOUDFRONT_ID} | jq -r '.Distribution.DomainName') echo ${CLOUDFRONT_URL} -
Go to the URL to see the delivery of the primary region content. Optionally, you can type the Cloudfront URL on your web browser.
curl -s ${CLOUDFRONT_URL} # "File in Virginia S3"
8. Test the Origin Group Failover
-
Remove the index.html file from the primary region.
aws s3 rm s3://${VIRGINIA_LAB_BUCKET}/index.htmlThis step causes an 404 error. It will trigger the Failover mechanism.
-
Reaccess the URL of the distribution created on Amazon CloudFront to see delivery from the secondary region.
curl -s ${CLOUDFRONT_URL} # "File in California S3" -
(Optional) copy the file back to the primary region but with another name
aws s3 cp virginia.index.html s3://${VIRGINIA_LAB_BUCKET}/virginia.html -
(Optional) Access the file with the new name to see the return of the primary region
curl -s ${CLOUDFRONT_URL}/virginia.html # "File in Virginia S3"This step shows that new requests will be directed to Primary Region first even after the previous request has failed.
9. Cleaning up
-
Disable distribution using the update distribution configuration feature.
CLOUDFRONT_DIST=$(aws cloudfront get-distribution-config --id ${CLOUDFRONT_ID}) # Cloudfront Distribution info CLOUDFRONT_ETAG=$(echo $CLOUDFRONT_DIST | jq -r '.ETag') # Cloudfront ETag echo $CLOUDFRONT_DIST | jq -r '.DistributionConfig' | jq -r .Enabled="false" > mini-lab-example-disabled.json # Change Enabled parameter to "false" CLOUDFRONT_ETAG=$(aws cloudfront update-distribution \ --id ${CLOUDFRONT_ID} \ --if-match ${CLOUDFRONT_ETAG} \ --distribution-config file://mini-lab-example-disabled.json \ | jq -r .ETag) -
Wait a few minutes until the distribution is removed. You can check the deletion already finished using the command below:
STATUS=InProgress while [ "$STATUS" == "InProgress" ]; do STATUS=$(aws cloudfront get-distribution \ --id ${CLOUDFRONT_ID} | jq -r '.Distribution.Status') echo "Status: "$STATUS sleep 3 done -
Remove the Amazon CloudFront distribution created for the lab.
aws cloudfront delete-distribution --id ${CLOUDFRONT_ID} --if-match ${CLOUDFRONT_ETAG} -
Delete the Origin Access Identity used in the lab.
OAI_ETAG=$(aws cloudfront get-cloud-front-origin-access-identity --id ${OAI_ID} | jq -r '.ETag') aws cloudfront delete-cloud-front-origin-access-identity \ --id ${OAI_ID} --if-match ${OAI_ETAG} -
Delete buckets used in the lab in both regions.
aws s3 rb s3://${VIRGINIA_LAB_BUCKET} --force aws s3 rb s3://${CALIFORNIA_LAB_BUCKET} --force -
Delete the files created for the lab.
rm virginia.index.html \
   california.index.html \
   virginia-s3-policy.json \
   california-s3-policy.json \
   cf-distribution.json \
   mini-lab-example-disabled.json
Conclusion
With this exercise, it was possible to verify how Amazon CloudFront distributions can be resilient by using two or more origins with the Origin Group feature in a strategy of the type Warm-Standby.
References: