AWS EKS - DR Environment Using Kubefed
Note: On the date of publication of this lab, the current version of KubeFed is beta, thus it is recommended for testing purposes only. Check the KubeFed status if you plan to use it.
Note: There are other methods for using EKS in a multi-region scenario. For more details visit: Using GitOps and AWS EKS to Manage HA & DR
Objective
This exercise will show you the steps to set up and use KubeFed that allows you to coordinate the configuration of multiple Kubernetes clusters from a single set of APIs in a cluster and can be used in a multi-region scenario.
By the end of this exercise, you will be able to:
- Configure KubeFed to coordinate the configuration of multiple Kubernetes clusters
- Deploy an application that will be created on two Kubernetes clusters in target regions
- Use Amazon Route 53 to configure DNS resolution with healthcheck for both regions
Estimated Duration: 1 hour
Approximate Cost: 10 USD
Solution Overview
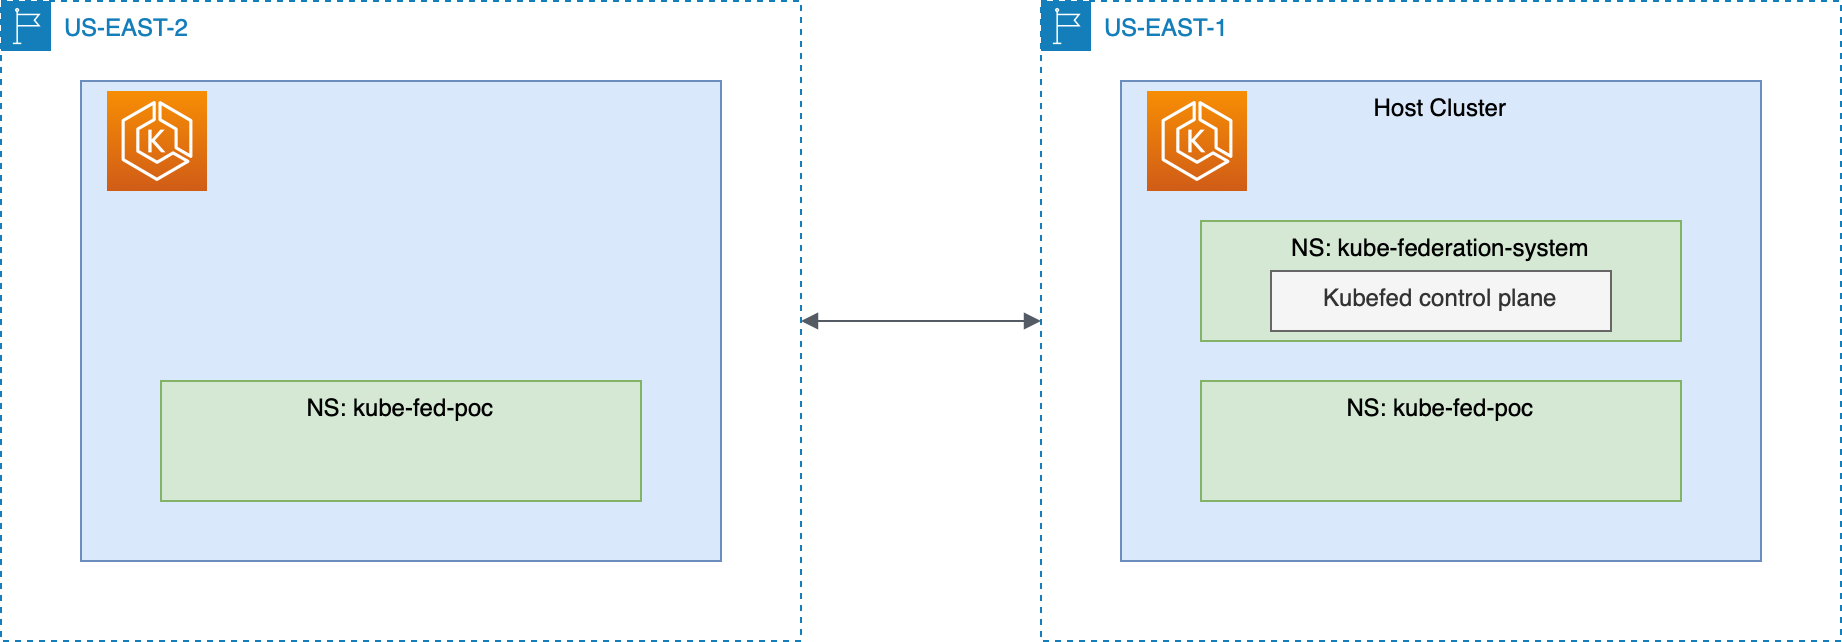
Execution
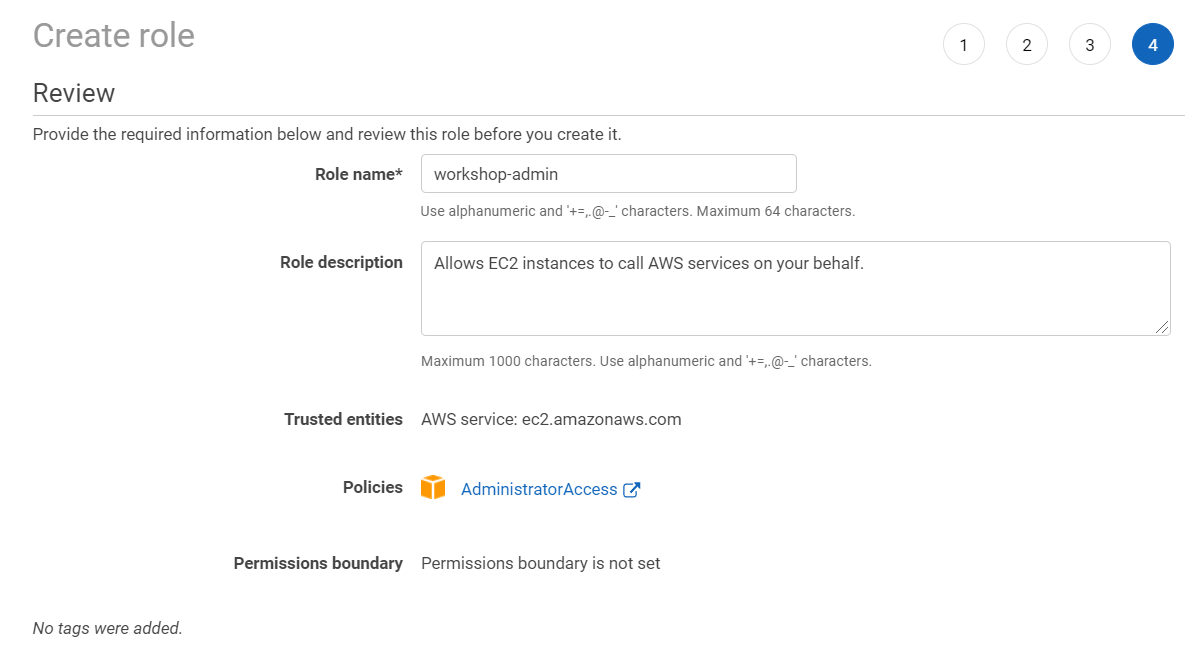
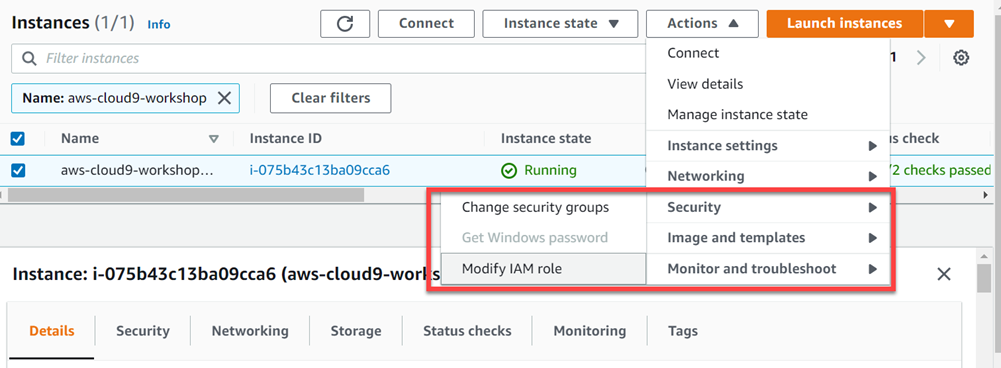
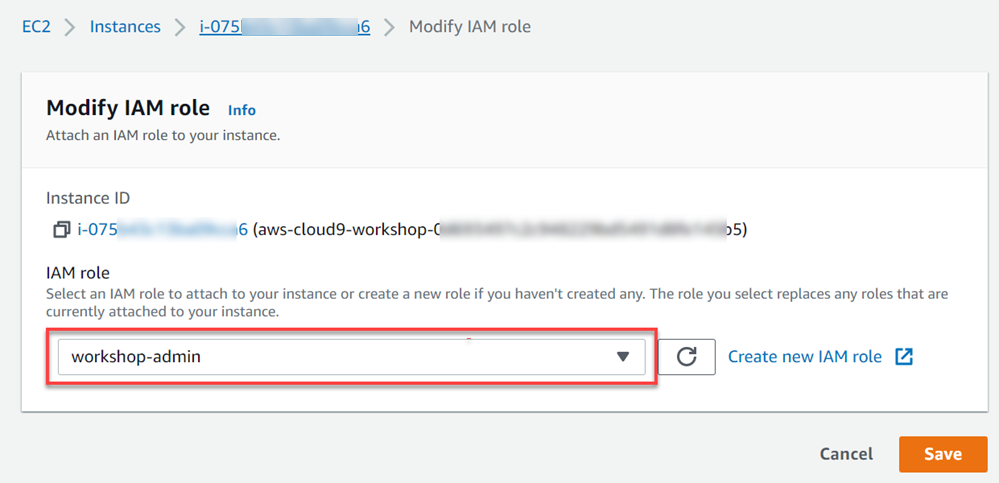
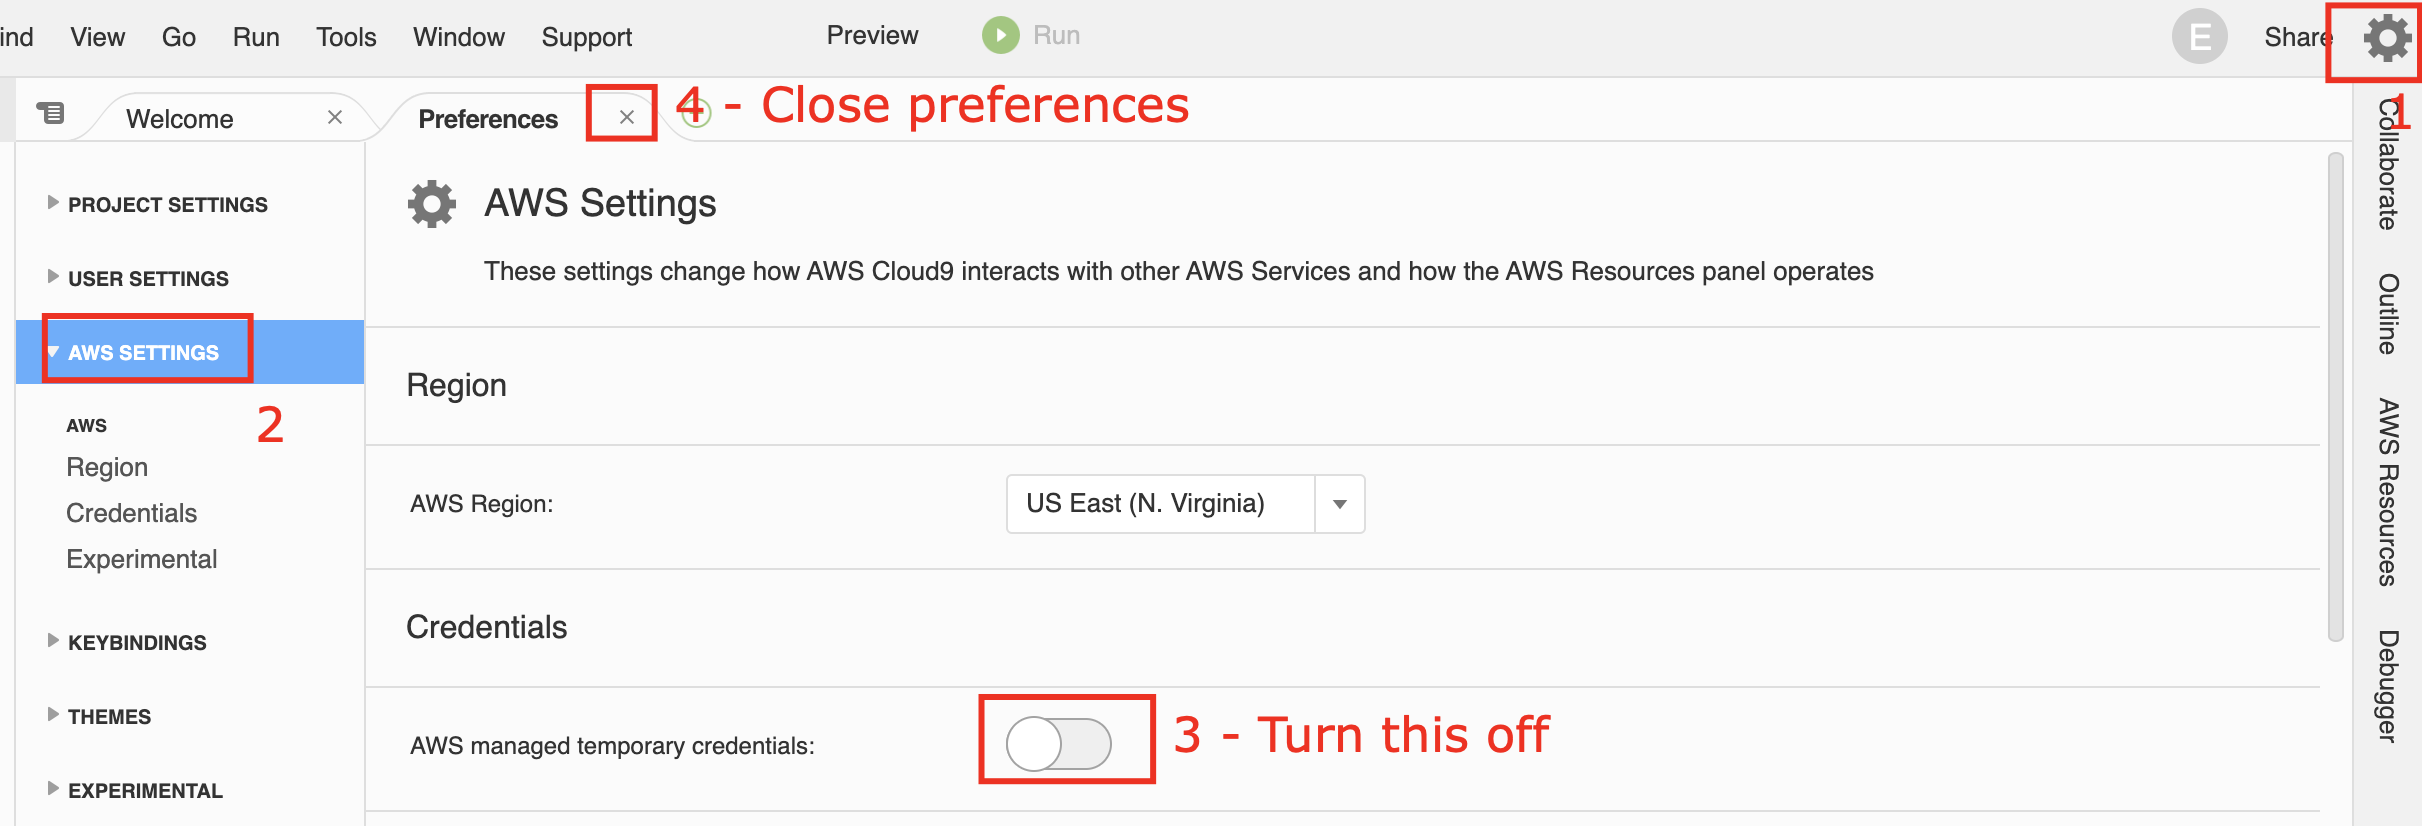
If you haven’t already created your environment on AWS Cloud9, start by creating your workspace. Click here.
For this exercise, use N. Virginia (us-east-1) as the main region and the N. California (us-west-1) as the secondary region.
1. Create Amazon EKS Cluster
-
Install kubectl, eksctl and helm
# Install dependencies sudo yum install jq openssl bash-completion -y export AWSACCOUNT=$(aws sts get-caller-identity | jq -r '.Account') export ROLE_ARN=$(aws sts get-caller-identity | jq -r '.Arn') # Install kubectl sudo curl --silent --location -o /usr/local/bin/kubectl \ -o kubectl https://s3.us-west-2.amazonaws.com/amazon-eks/1.23.7/2022-06-29/bin/linux/amd64/kubectl sudo chmod +x /usr/local/bin/kubectl # Bash completion for kubectl kubectl completion bash >> ~/.bash_completion . /etc/profile.d/bash_completion.sh . ~/.bash_completion # Install eksctl curl --silent --location "https://github.com/weaveworks/eksctl/releases/latest/download/eksctl_$(uname -s)_amd64.tar.gz" | tar xz -C /tmp sudo mv -v /tmp/eksctl /usr/local/bin # Bash completion for eksctl eksctl completion bash >> ~/.bash_completion . /etc/profile.d/bash_completion.sh . ~/.bash_completion # Install helm curl -sSL https://raw.githubusercontent.com/helm/helm/master/scripts/get-helm-3 | bash -s -- --version v3.8.2 -
Create Two Amazon EKS Clusters in the target AWS Regions .
Note that it takes approximately 15-20 minutes to create a cluster in Amazon EKS, theses commands below will create both clusters in parallel.
# Create primary cluster
eksctl create cluster --name kubefed-cluster \
  --version 1.23 \
  --managed \
  --alb-ingress-access \
  --region=us-east-1 &

# In order to speed up, we're using '&' to execute in background*

# Create secondary cluster
eksctl create cluster --name kubefed-cluster \
  --version 1.23 \
  --managed \
  --alb-ingress-access \
  --region=us-west-1 &

# Wait for completion
aws cloudformation wait stack-create-complete --stack-name eksctl-kubefed-cluster-cluster --region us-east-1
aws cloudformation wait stack-create-complete --stack-name eksctl-kubefed-cluster-cluster --region us-west-1
Do not stop the process (CTRL+C or Command+C), because after the cluster creation your environment will be set up. This step is important to have kubectl authenticated in your clusters.
-
Rename kubectl config contexts to make it easier to use later
aws eks update-kubeconfig --name kubefed-cluster --region us-east-1
aws eks update-kubeconfig --name kubefed-cluster --region us-west-1
kubectl config rename-context $(kubectl config get-contexts --no-headers=true -o name | grep us-east-1:$AWSACCOUNT) kubefed-cluster.us-east-1
kubectl config rename-context $(kubectl config get-contexts --no-headers=true -o name | grep us-west-1:$AWSACCOUNT) kubefed-cluster.us-west-1
kubectl config get-contexts
2. Set Up KubeFed
-
Add Helm Repository and Update
# Change context to cluster in N. Virginia (us-east-1) kubectl config use-context kubefed-cluster.us-east-1 # Add Helm repository and update helm repo add kubefed-charts https://raw.githubusercontent.com/kubernetes-sigs/kubefed/master/charts helm repo update -
Install KubeFed
helm --namespace kube-federation-system upgrade -i kubefed kubefed-charts/kubefed --version=0.10.0 --create-namespace -
Confirm that controllers and webhooks are running
kubectl get pods -n kube-federation-systemThe Return will look like the following
-
Install kubefedctl and join both clusters to kubefed
# Install kubefedctl
curl -LO https://github.com/kubernetes-sigs/kubefed/releases/download/v0.9.1/kubefedctl-0.9.1-linux-amd64.tgz
tar -zxvf kubefedctl-*.tgz
chmod u+x kubefedctl
sudo mv kubefedctl /usr/local/bin/ # make sure the location is in the PATH

# Join clusters
# Federating the cluster itself
kubefedctl join kubefed-cluster.us-east-1 --cluster-context kubefed-cluster.us-east-1 --host-cluster-context kubefed-cluster.us-east-1 --v=2

# Join secondary cluster
kubefedctl join kubefed-cluster.us-west-1 --cluster-context kubefed-cluster.us-west-1 --host-cluster-context kubefed-cluster.us-east-1 --v=2

# Status list
kubectl -n kube-federation-system get kubefedclusters
Wait until the last command shows that both clusters are Ready = True as can be seen above.
3. Deploy an application in both regions
-
Create a Namespace
kubefed-minilaband federate with both clusters# Create namespace kubefed-minilab kubectl create namespace kubefed-minilab # Federate the namespace (by default, it will be federated for all clusters in kubefed) kubefedctl federate namespace kubefed-minilab # Check if namespace is federated to both clusters kubectl get federatednamespace kubefed-minilab -n kubefed-minilab -o=json | jq '.status.clusters' -
Create a
FederatedDeploymentandFederatedServicefrom aDeploymentandServiceordinary# Create manifest for Deployment and Service of one appication cat << EOF > deployment.yaml apiVersion: apps/v1 kind: Deployment metadata: name: example-app namespace: kubefed-minilab spec: selector: matchLabels: app: example-app replicas: 1 template: metadata: labels: app: example-app spec: containers: - name: example-app image: public.ecr.aws/b3r7s4o5/eks-hello:1.2 ports: - containerPort: 80 env: - name: NODE_NAME valueFrom: fieldRef: fieldPath: spec.nodeName - name: POD_NAME valueFrom: fieldRef: fieldPath: metadata.name resources: requests: memory: "64Mi" cpu: "250m" limits: memory: "128Mi" cpu: "500m" livenessProbe: httpGet: path: / port: 80 initialDelaySeconds: 5 periodSeconds: 5 timeoutSeconds: 10 failureThreshold: 5 readinessProbe: httpGet: path: / port: 80 initialDelaySeconds: 5 EOF cat << EOF > service.yaml apiVersion: v1 kind: Service metadata: name: example-app-svc-lb namespace: kubefed-minilab spec: ports: - name: http port: 80 protocol: TCP targetPort: 80 selector: app: example-app type: LoadBalancer EOF # Create FederatedDeployment and FederatedService kubefedctl federate -f deployment.yaml > federated_deployment.yaml kubefedctl federate -f service.yaml > federated_service.yaml -
Deploy
FederatedDeploymentandFederatedServicekubectl apply -f federated_deployment.yaml kubectl apply -f federated_service.yaml -
List the resources of the kubefed-minilab namespace across all clusters (Wait a few minutes until the container is in state
Running)for c in `kubectl config get-contexts --no-headers=true -o name` do printf "\n------------\n\nCluster Resources: [$c]\n" kubectl get all -n kubefed-minilab --context=$c done
4. Access the application in both regions
-
Access the application of each region through your browser
# List the load balancer addresses
for c in `kubectl config get-contexts --no-headers=true -o name`
do
  printf "Cluster Load Balancer [$c]: "
  echo http://$(kubectl get service example-app-svc-lb -n kubefed-minilab --context=$c -o json | jq -r '.status.loadBalancer.ingress[0].hostname')
done
Simply access the load balancer address for each of the regions through your browser. The container used in the deployment returns instance_metadata of the instance on which the container is running. In this metadata it is possible among other information to see which region it is running. For more information on instance_metadata access is documentation.
5. Configure Route 53 Failover Between the Two Regions
In this step of the exercise we will configure Amazon Route 53 with previously created DNS entries from our two LoadBalancers in different regions.
-
To create a private zone you will need to associate it with a VPC, so let’s get the ID from our VPC where we climbed our Cloud9 EC2.
# Get Default VPC ID
export VPC_ID=$(aws ec2 describe-vpcs --filters Name=isDefault,Values=true | jq -r '.Vpcs[0].VpcId')

# Create private hosted zone and associate to Default VPC
export ZONE_ID=$(aws route53 create-hosted-zone --name my.private.hz --vpc "VPCRegion=us-east-1,VPCId=${VPC_ID}" --hosted-zone-config 'Comment=private,PrivateZone=true' --caller-reference $(date "+%Y%m%d%H%M%S") | jq .HostedZone.Id | cut -d '/' -f3)
Now that we’ve created our DNS Zone we’ll configure active-passive failover. For more information about routing policies on AWS, visit this documentation.
-
Let’s create the health check for our primary endpoint that will be in us-east-1
# Export Load Balancer DNS
export LB_US_EAST_1=$(kubectl get svc example-app-svc-lb -nkubefed-minilab --context kubefed-cluster.us-east-1 -o json | jq '.status.loadBalancer.ingress[0].hostname')
export LB_US_WEST_1=$(kubectl get svc example-app-svc-lb -nkubefed-minilab --context kubefed-cluster.us-west-1 -o json | jq '.status.loadBalancer.ingress[0].hostname')
# Health check policy cat > create-health-check.json << EOF { "Type": "HTTP", "ResourcePath": "/health", "FullyQualifiedDomainName": ${LB_US_EAST_1}, "RequestInterval": 30, "FailureThreshold": 3 } EOF# Create Healthcheck for Route 53 export HEALTH_ID=$(aws route53 create-health-check --caller-reference $(date "+%Y%m%d%H%M%S") --health-check-config file://create-health-check.json | jq .HealthCheck.Id) -
Creating our primary endpoint using Failover routing policy.
# Create DNS entry definition - Primary
cat > failover.json << EOF
{
    "Comment": "Failover DNS Primary",
    "Changes": [
      {
        "Action": "CREATE",
        "ResourceRecordSet": {
          "Name": "dr-app.my.private.hz",
          "Type": "CNAME",
          "SetIdentifier": "primary-lb",
          "Failover": "PRIMARY",
          "TTL": 60,
          "ResourceRecords": [
            {
              "Value": ${LB_US_EAST_1}
            }
          ],
          "HealthCheckId": ${HEALTH_ID}
        }
      }
    ]
}
EOF
# Create private hosted zone entry aws route53 change-resource-record-sets --hosted-zone-id $(echo $ZONE_ID | tr -d '"' ) --change-batch file://failover.jsonThe healthcheck will be active in 30 seconds.
-
Creating our secondary endpoint using Failover routing policy.
# Create DNS entry definition - Secondary
cat > failover.json << EOF
{
    "Comment": "Failover DNS secondary",
    "Changes": [
      {
        "Action": "CREATE",
        "ResourceRecordSet": {
          "Name": "dr-app.my.private.hz",
          "Type": "CNAME",
          "SetIdentifier": "secondary-lb",
          "Failover": "SECONDARY",
          "TTL": 60,
          "ResourceRecords": [
            {
              "Value": ${LB_US_WEST_1}
            }
          ]
        }
      }
    ]
}
EOF
# Create private hosted zone entry aws route53 change-resource-record-sets --hosted-zone-id $(echo $ZONE_ID | tr -d '"' ) --change-batch file://failover.json
Note that we’re associating healthcheck with the primary only.
-
Resolve the DNS we created and verify which LoadBalancer endpoint it is pointing to (Because we associate the hosted zone with the VPC of the Cloud9 instance we were able to resolve DNS).
curl -XGET http://dr-app.my.private.hzIf everything is right, the application will reply “Instance Metadata”. The result of the attribute region should be.
{
"region": "us-east-1"
}
6. Simulate us-east-1 primary region failure
-
Let’s update our
FederatedDeploymentmaking our application’s POD only exist in the regionus-west-1.cat > federated_deployment.yaml << EOF apiVersion: types.kubefed.io/v1beta1 kind: FederatedDeployment metadata: name: example-app namespace: kubefed-minilab spec: placement: clusters: - name: kubefed-cluster.us-west-1 template: spec: replicas: 1 selector: matchLabels: app: example-app template: metadata: labels: app: example-app spec: containers: - image: public.ecr.aws/b3r7s4o5/eks-hello:1.2 name: example-app env: - name: NODE_NAME valueFrom: fieldRef: fieldPath: spec.nodeName - name: POD_NAME valueFrom: fieldRef: fieldPath: metadata.name ports: - containerPort: 80 resources: limits: cpu: 500m memory: 128Mi requests: cpu: 250m memory: 64Mi EOF -
Let’s apply our new manifesto
kubectl apply -f federated_deployment.yamlWait 1-2 minutes until the propagate update in our DNS zone. You check the DNS answer using the command below. The DNS reply will switch from Load Balancer address *.us-east-1.elb.amazonaws.com to *.us-west-1.elb.amazonaws.com
dig +short dr-app.my.private.hz -
Run the CURL again on our endpoint.
curl -XGET http://dr-app.my.private.hzIf everything is right, the application will reply “Instance Metadata”. The result of the attribute region should be.
{
 "region": "us-west-1"
}
7. Cleaning up
-
Delete the cluster and its associated nodes with the following command.
eksctl delete cluster --region=us-east-1 --name kubefed-cluster
eksctl delete cluster --region=us-west-1 --name kubefed-cluster
Conclusion
With this exercise, it was possible to understand how you can federate multiple clusters into a single cluster to use a single Deployment and Service manifest to replicate a POD across multiple regions.